I recently configured a Raspberry Pi for a friend using Xbian and a Sony 46" LCD. It worked flawlessly with CEC support although there were a few commands that the Sony TV (remote) would not pass through the HDMI cable to the Pi.
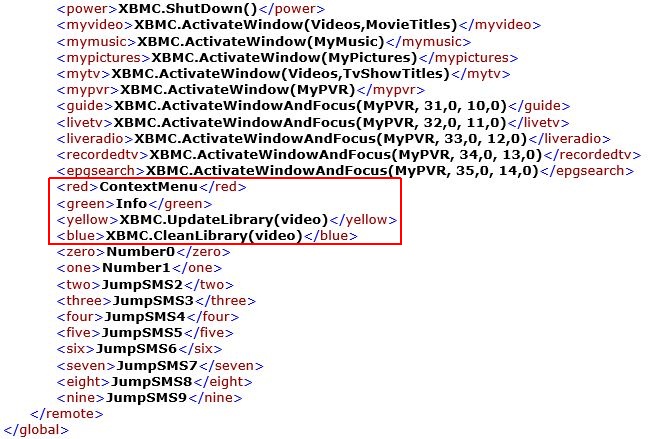
As such, I had no Context Menu or Info button which are both rather useful. After spending a few hours searching about, I managed to resolve it by remapping the coloured buttons below the D-Pad to perform the following:
Red = Context Menu
Blue = Info
Yellow = Update video library
Green = Clean video library
You can only remap buttons that are supported by your TV remote. i.e. If you push a button on your TV remote and your TV performs a TV function (in my case the number buttons switched back to TV and that channel) or the TV displays a message saying "Unsupported" or something similar, there is nothing you can do with that button. Those buttons are not being sent via CEC back to the Pi over HDMI.
What you need:
The IP address of your Pi.
WinSCP or a similar tool to SCP into your Xbian instance.
- Using WinSCP, navigate to root/usr/local/share/xbmc/system/keymaps/remote.xml.
- Copy the remote.xml file to your local machine.
- Edit the remote.xml file so that the coloured buttons under the global section match your requirements. Mine is shown right.
- Copy the remote.xml file back to /home/xbian/.xbmc/userdata/keymaps then reboot your Pi.

Brilliant, thanks!
ReplyDeletei can't find the initial remote.xml to perform a copy...
ReplyDeleteUsing ubuntu with xbmc
best regards Oskar
This may help? http://wiki.xbmc.org/index.php?title=Keyboard.xml
Deletethanks for the fast answer, but there is no remote.xml like in your post.
ReplyDeleteshall i use the keyboard.xml instead of the remote.xml ??
confused :)
Section 2 there is a link to download a default keyboard.xml file. Modify this as required and save to userdata/keymaps. Name is not important as long as it ends with .xml.
DeleteThis comment has been removed by the author.
ReplyDeleteThanks! Very useful information.
ReplyDeleteI've just attached a Pulse8 CEC adapter and mapped my Sony remote as follows
LoadProfile(Kids)
LoadProfile(Master user)
XBMC.UpdateLibrary(video)
XBMC.ActivateWindow(videos,TvShowTitles)